Salesforce: Reference Request
The Request a Reference 3.529 feature for the Salesforce integration allows a Salesperson to request a reference from advocates for an Opportunity from within Salesforce. This article will specifically guide you through the overview of the new Reference Request component in Salesforce (Classic and Lightning version).
Here’s what you can do with the Influitive Reference Request tool in Salesforce:
- Allow salespeople to easily request a reference in Salesforce, using different filtering criteria to specify the desired type of ideal reference for the opportunity.
- You can decide which Hub members to recommend in the Request a Reference screen. This will streamline the reference request process for your Sales team by identifying the best advocates to choose from.
- Customize the Reference Request challenge template.
- Award your members' points for participating in the reference call.
This article will cover:
- Setting Up The Request A Reference Feature
- Reference Request Tool Flow
- Reference Requestor Experience (Classic and Lightning)
- Administrator Experience
- Advocate Experience
- Track Progress and Closing the Loop
- References Received via Influitive
A. Configuring your Salesforce Instance
1. Install Influitive Salesforce AppExchange Package 3.529 version
Note that you will require your Salesforce administrator for these steps to install the Influitive Salesforce AppExchange Package and add the Reference Request tool to your Opportunity Layout.
For full instructions on how to do this, see this setup article: New Influitive Salesforce AppExchange Package Setup Overview
Optional: Please follow this instruction on How to add the Reference request tool as a button in Salesforce.
Before moving to the next steps, make sure you have the following Salesforce components added:
| Lightning Version | Classic Version |
|
|
2. Influitive Reference Request Configuration
Once you've installed the Influitive-Salesforce AppExchange package, the Influitive Configuration component is added. This configuration setting will allow you to customize the Salesforce Reference Tool:
- Changes in the first step where you can choose to show Account and Opportunity related contacts or just Opportunity related contacts only.
- Hide the second step of the Reference tool to recommend the list of references.
- Make the Notes to administrators section mandatory or optional.
Please follow these instructions to access the configuration settings.
- Go the App Launcher > Search "Influitive Configuration" and select.
- In the Influitive Configuration page, you can make changes to each Step of the Reference Request tool.
- References - Prospect Contacts. This setting affects Step 1 where you can choose either to display Account & Opportunity Contacts or Opportunity Contacts only on the Prospect Information dropdown.
- References - Suggestion Step. This setting affects Step 2 where you can choose either to:
1. Display the optional Reference Criteria matching process.
2. Display the Reference Criteria matching process with anonymized contacts (only company name will display, name and other information will be hidden).
3. Completely hide the optional Reference Criteria matching process and skip to the next stage.
- References - Admin Notes. This setting affects Step 3 where you can choose to require Sales Rep to submit notes or mark it optional before submission. The content written in the Important Notes section will appear on the unpublished Reference Challenge Draft for the Hub administrator to review.
- Once the customizations are selected and saved, the changes will appear on the Reference Request tool immediately. Please head over to Opportunity > Reference Request tool to check the customization applied.


B. Configuring your AdvocateHub integration
1. Setting Up Your Reference Program Group
By default, your AdvocateHub will have a group called Reference Program. The first step in setting up reference requests for specific advocates is to set this group up. If you already have a reference group setup, you can skip this step and use that group instead. If you’re open to letting everyone in your Hub be a potential reference, you can skip this step as well.
There are two ways to add advocates to this group:
1. You can manually add advocates to this group. To do so, simply click on the Add Advocates button in your group.

2. Create a challenge asking advocates to join the reference group. There are a couple templates available for this in the Challenge Template Library. You can search for "Reference Group" to find them:


2. Set up Reference Request Challenge Template
You may want to modify the default contents of the Reference challenge in your Challenge Template Library. This way all new reference challenges that get created through the Salesforce integration will be in the desired format, and only smaller tweaks are required before you can publish them. To do this, find your Reference challenge in the Challenge Template Library and simply click on it to edit.

The standard stages of the Reference challenge are as follows:
- Advocate Workflow - Advocate accepts to take on the reference call. Small amount of points awarded.
- Corporate Workflow - Admin coordinates the call and confirms the call has been scheduled.
- Advocate Workflow + Answer Some Questions - Advocate confirms call was completed and provides feedback on how it went. More points awarded, especially if feedback is provided.
- Corporate Workflow - Admin confirms call got completed and approves challenge completion, awarding the advocate the remaining, largest portion of the points.
Make sure the stages reflect the reference process in place at your company, and modify as required. We also encourage you to edit the copy of the challenge to match the overall messaging of your hub. Here's how:
- Add Merge fields are a great way to add a personal touch to the challenge.
- Set any Acts of Advocacy stages to either: Join a Reference call, Make an Introduction to a Prospect, Nurture a Prospect. These Acts of Advocacy is what will be pushed to Salesforce when actioned by the Hub member in the Hub.
- Make sure to keep the Challenge Types as Reference, this is because this type of challenge has a form that displays the Salesforce Opportunity contact information.

When editing the template, you may also want to control what information gets captured from the reference requestor in Salesforce – this can help you further target the challenge and make it engaging. You can do this by adding your questions to the ‘Notes to Administrator’ field, as shown below.
The challenge requestor will then see these notes when they are submitting their request, and know what information to provide.

3. Reference Request Salesforce field mappings
- After signing in to the AdvocateHub App as an administrator. Go to Settings > Integrations > Salesforce > Manage > Click on Enable Reference Requests
Select your reference group that you’ve setup in Step B from the drop down menu. If you don’t have a specific group, you can keep it to “Any Group”. Once you save your changes, only Hub members from this group will be in the suggested list in the reference requests tool via Salesforce.

Next, use the drop-down menus to map information from Salesforce to the Hub. You will first need to map information regarding the Prospect. For example, you can map: Name, Company, Title, Email, and Phone

The information mapped here will appear in Step 1 of the Reference Request tool when choosing a Prospect.
- Then, you will need to map the criteria that will be used when filtering Hub members for a reference e.g. Industry, Position, Product. Mark the Autofill to ensure that the value will be auto-populated in the filters on Step 2.


Here's what the filters look like in the Salesforce Reference tool.

Remember that you will need to have completed the Automatic Customer Data Import as per Step A2 for this to work.
Once you have done this, don't forget to click Save. This mapping will be used to auto-populate the Reference Request form in Salesforce.
B. Reference Request Tool Flow
Once the integration is set up, references can be requested directly in Salesforce by clicking the ‘Request-a-Reference’ button on the opportunity. Here are the following experience walkthroughs for:
- Reference Requestor Experience (Salesforce Classic)
- Reference Requestor Experience (Salesforce Lightning)
- Hub Administrator Experience
- Hub Member Experience
Reference Requestor Experience (Salesforce Classic)
1. The Requestor heads over to the Opportunity Object > Request a Reference button. Then a pop-up will appear where the prospect information is filled in.

2. Based on this data, the second step allows the requestor to recommend a potential reference/references by assigning weights to different matching criteria/Custom Profile Field, such as Industry or Position.
If the reference requestor made suggestions on the ideal advocate(s) here, the unpublished challenge that gets created in your AdvocateHub for the Administrator to review will automatically be targeted to those people.
3. The third step involves providing any additional information on the request. Then click Submit to send it to the AdvocateHub Administrator

4. The last step is the review page where you can confirm the information you've selected. Click the Submit button to send the Reference Request to the Influitive Hub.

You should get the following success notification once the reference request challenge is submitted.

Reference Requestor Experience (Salesforce Lightning)
- The Requestor heads over to the Opportunity Object > Select the Opportunity Records > Request a Reference Tab or Button
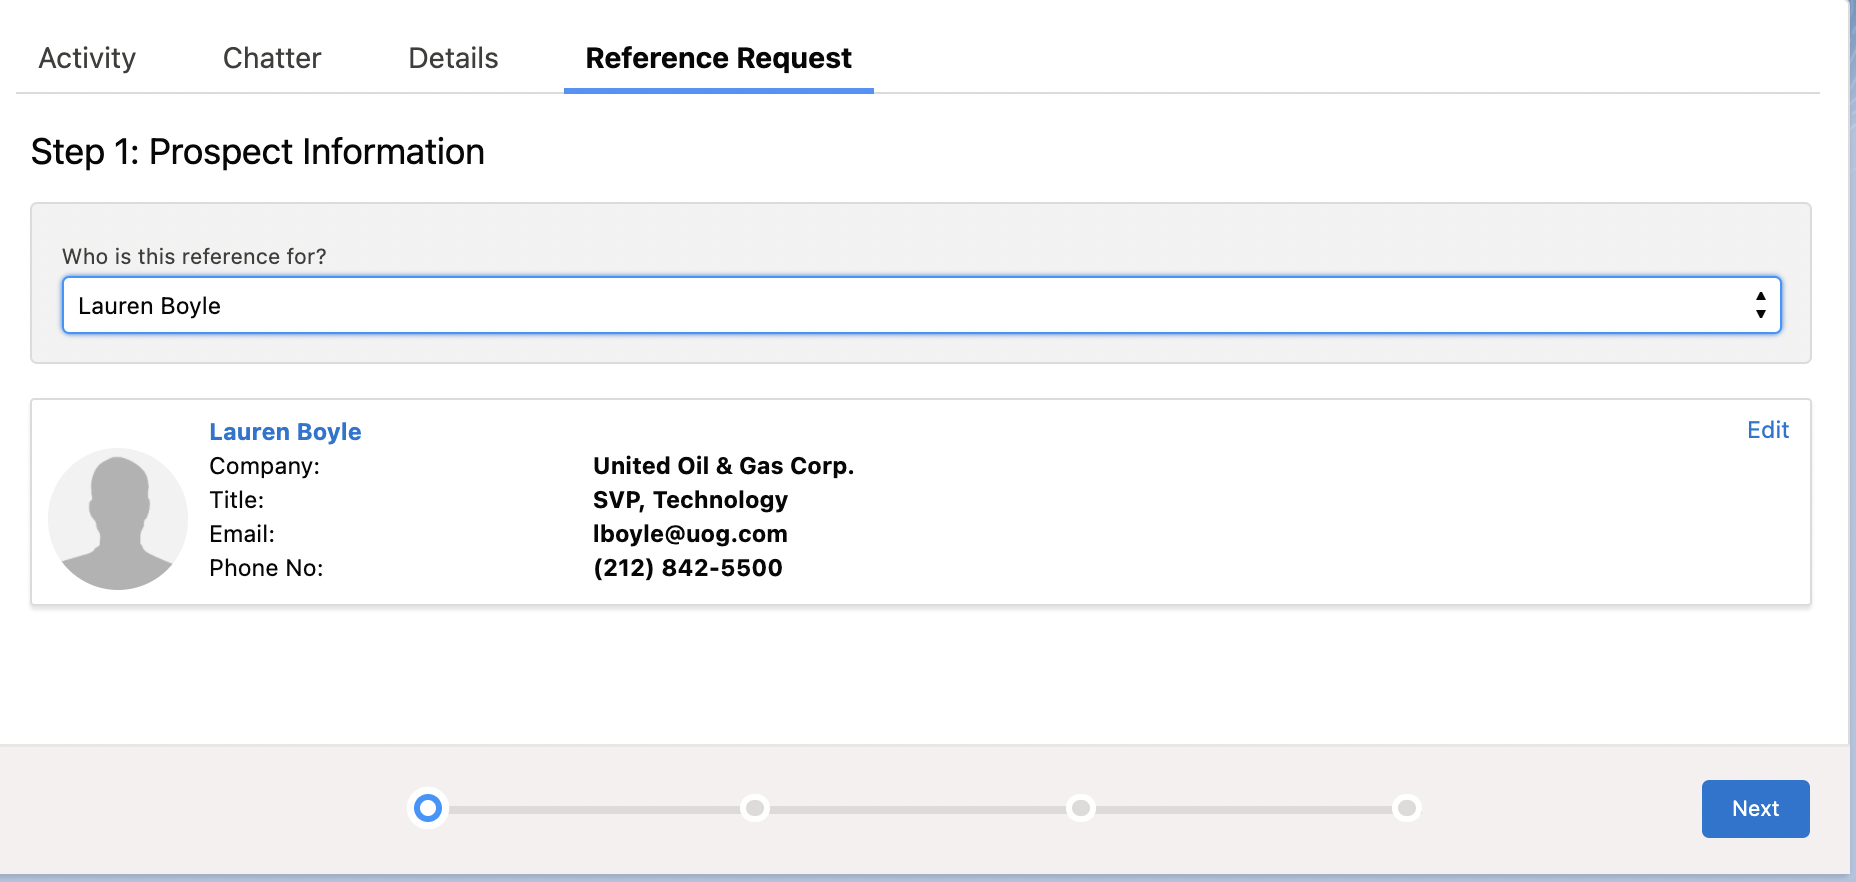
Choose a contact under "Who is this reference for?". The Prospect Information will be filled out if you have mapped the necessary fields in the Hub's Salesforce Integration.

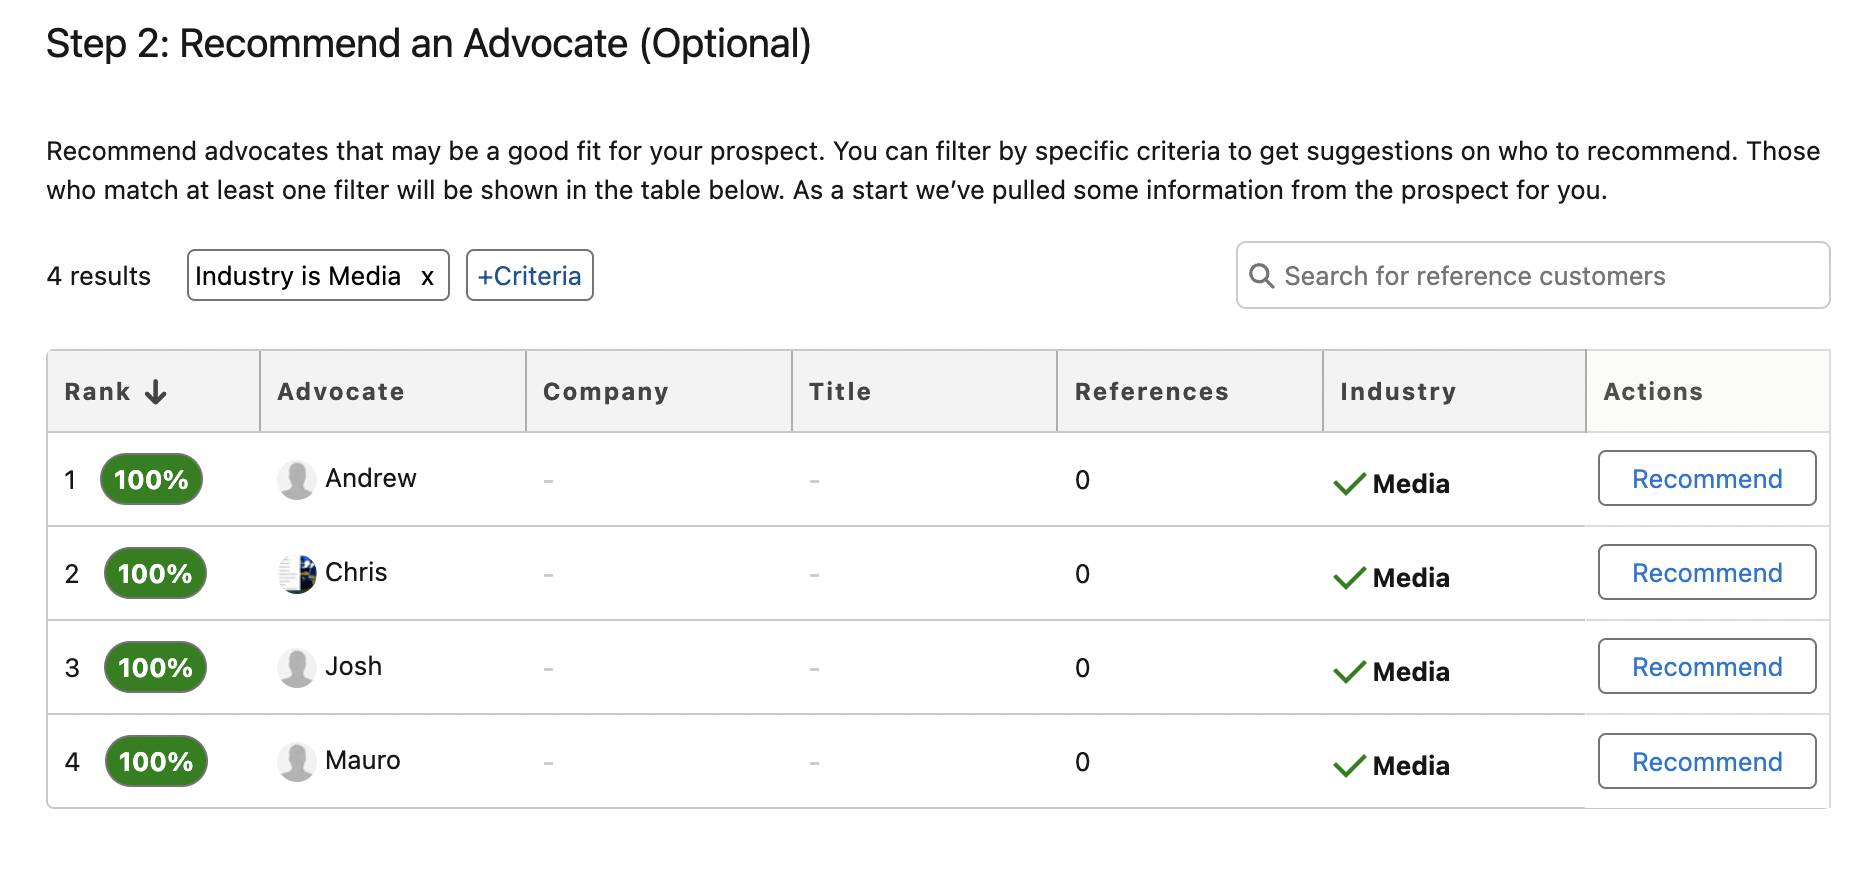
Once done, head over to the Step 2: Recommend an Advocate Tab where you can choose the specific type of customers to use as a reference:

Lastly, you will need to go to the Reference Information Tab and fill in the Important Notes to Administrator if required. Once everything is filled out, click Next.

Lastly, you're in the last step where you can review the information you've selected. Once confirmed, click Submit.

You should get the following success notification once the reference request challenge is submitted.


Hub Administrator Experience
Once it's pushed to the Hub, the Hub Administrators will get a notice/warning on their Dashboard that there are Reference Request waiting to be published:

If Hub administrators have their notifications enabled, administrators will also be getting an email notification letting them know that there is a new reference request waiting to be reviewed in the Hub.

Clicking Review will bring the Hub administrator to the Challenges page and show the unpublished Reference Requests.

Advocate Experience
In your AdvocateHub, after being reviewed and published by the Hub administrator, the reference request will become visible to the matched Hub members(s) in the form of a challenge.

Should a Hub member accept the challenge, they will be guided through the reference workflow. They can track their progress in the challenge, and receive points as the prospect moves along and hopefully becomes a customer. Throughout the process, the Hub member will be able to interact with the Hub Administrator, and provide feedback.


Track Progress and Closing the Loop
To close the loop, the salesperson that initially requested the reference will also be able to track its progress in Salesforce. This occurs in the ‘ Inlfuitive Acts of Advocacy’ section on the contact record that completed the Reference Request. To have this data pass through, you would need to set up the Salesforce: Advocacy Insight feature.
For the example below, this is the Influitive Acts of Advocacy view for a contact (Jumba Jukiba) who completed a reference call for Francis Karel and Josh Davis.
Salesforce Classic View

Salesforce Lightning View

Additionally, the progress of the Reference challenge will also be available under the References Received via Influitive Related list in the contact record of the Opportunity contact selected as the Prospect. For this example, here is the References Received via Influitive view on Francis Karel's contact record. The contact record Jumba Jukiba completed the Reference call.
Salesforce Classic View

Salesforce Lightning View

Salesforce Dashboard Report: Reference Impact
The new package version 3.0 will include a pre-made and ready-to-use. You are free to customize the filters and report data to your preferences. This Dashboard is accessible after you've installed the AppExchange package 3.0 version.
In your Salesforce instance, head over to Dashboards > select Influitive Dashboard 3.0


