Discussions: How to create a new Topic
Here's what this article will cover:
Creating a New Topic
- 1
- Go to the Discussions Homepage (Admin view > Discussions > View or Advocate View Homepage). To start a new topic, click on the + New Topic button. The editor window will appear (pictured below):
-

Alternatively, you can go into a specific Discussions Category under Category Tab > Select a Category > Click the + New Topic.
- 2
-
In the editor, start by writing the Title of your topic, it could be a sentence, a question, or a link to a website. Topic titles should be a minimum of 15 characters.
- 3
- Choose the Category that you would like this Topic to live in. Please be sure to place the topic in the relevant Category for more engagement
-

- 3
- Write the content of your topic in the text box. Use the editor toolbar to format your text using lists, bold, italic, etc. Topic bodies must be a minimum of 20 characters.
-

- 4
-
As you write, the right-hand side of the panel will show you the preview pane that shows how your reply will look like once posted. Click "<< hide preview" if you want to hide it.
- 5
-
The editor may also provide a list of similar topics to reduce duplicates. Press the "ESC" button on your keyboard or click the "X" on the list of topics to close it.
- 6
-
Once you're happy with your post, click the + Create Topic button. You'll be directed to the new Topic that you've just posted.


Formatting your Post
Let's go over the formatting icons on the topic/post body editor toolbar:

- 1
- The speech bubble button is for quoting the original post or comment that you're replying to:
-

- 2
- This button is to bold your text
- 3
- This button is to italicize your text
- 4
- Inserting a Hyperlink
-

-
You can also share a link in your reply and it will auto-preview once posted. Do this with video links so other advocates can watch it straight from your reply.
-

- 5
- Use the quote button to create a quote in your post. The sentence will be placed in a grey box, as seen below:
-

- 6
- Preformatted text. Only needed when you use HTML to write your post
-

- 7
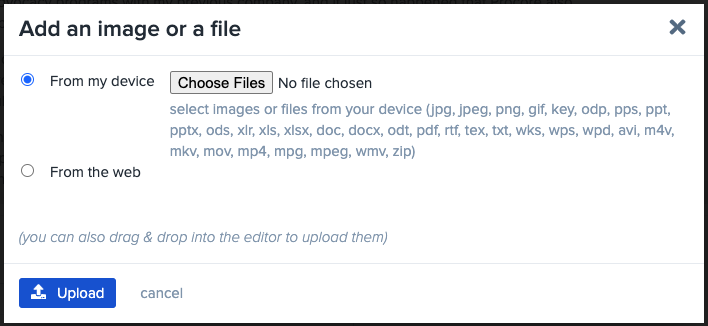
- Upload an image or file.
-
Click on this icon to attach an image or file to your post, it will be displayed in your post automatically. From there, you can choose to upload from your device (computer or mobile phone) or choose the image from the internet. When you choose "From the web", you can paste the URL link of the image. If you click on Show more, you can attach a URL link to your image. Click Upload once done. Please note that there is a 100MB limit to files uploaded to Discussions.
- 8
- Create a bulleted list.
- 9
- Create a numbered list.
- 10
- Add Emojis to your post.
-

- 11
-
The Option Gear icon contains a few menu options:
-

Toggle Unlisted: If you would like to create a new topic that only users who have access to the link can see, you can mark this Toggle Unlisted. The new Topic thread will only be visible and can only be accessed if the users have the link to the topic. To unlist it, you can click on the wrench icon and click "Make listed."

Hide details: This is to create a dropdown of hidden text in your post. You can compose a hidden text which the other users can click on if they want to read more information about your post.
Build Poll: You can also create a poll in your post. Types of polls can be Single Choice, Number Ratings, and Multiple Choice. You also have the option to show the voters and automatically close the poll at a certain date.

Here's what it looks like on your post:
After voting, members will see the results of the poll:


Note: you can add multiple polls to the same discussion topic and it should automatically add 'name' attribute with a unique value to the poll.
If you get any of the error messages below upon saving


Please make sure the polls have a unique value for the name attribute.

Editing your Topic Post
- 1
- To Edit the Topic that you've created, click on the ellipses (...) under the post > Click the pencil icon to edit the post.
-

- 2
- The editor will slide out and here you can add the reason for your edit.
- 3
- Once you're done with your edit, click Save Edit.
- 4
- An orange pencil will appear on the top right-hand side of the Topic post.
-

- 5
- If you click on this orange pencil, a window showing the historical edits will appear. The yellow highlighted text is the reason for the edit and the green or orange highlighted text is the edited/added text. If there is more than one revision, you can use the arrows on the top to look through the past revisions of this post.
-


Set URL Link to Open in a New Browser Tab
To allow members to open URL links in Discussion to a New browser Tab, you will need to insert the URL link via a HTML code format rather than via markdown or the URL link icon.
Here is the format of the HTML code to paste in the post builder:
<a href="insert_URL_Link" target="_blank">Insert_URL_Text_Display</a>
Here is the example:
<a href="https://amazon.ca/" target="_blank">Amazon Bookstore Website</a>
